


I have observed that many of my colleagues encounter challenges when it comes to grasping the intricacies of implementing type annotations for React Navigation in React Native. Navigating through the maze of TypeScript and React Navigation can be a daunting task, especially for those new to the ecosystem. In this blog post, I aim to demystify the process and provide a clearer understanding of how to incorporate type annotations seamlessly.
While the official documentation is undoubtedly a valuable resource, I am committed to making this topic more approachable and comprehensible by providing you with illustrative examples that serve as practical guides. If you've ever found yourself bewildered by the intricacies of type-checking your navigator in a React Native app, you've come to the right blog. Together, we'll delve into this subject and unravel the complexities, ensuring a clearer understanding along the way.
I'll demonstrate two examples featuring nested navigators with stacks of screens. The first example, with a two-level nested navigator, is designed for tutorial purposes. In contrast, the second example showcases a three-level nested navigator and is intended for exercise purposes.
No prerequisites are required. I assume you have a basic understanding of TypeScript and familiarity with TypeScript Generics.
Understanding Type Annotations: Why and where to use these types?
Our primary goal is to assign types to three objects: params, route, and navigation object. These objects belong to a screen and are particularly useful when accessing their properties.
For instance, consider the navigate property of the navigation object:
navigation.navigate("Screen1", { somePropertyOfScreen1ParamsObj: "some_value" });
Writing code like the example above can be error-prone and verbose. However, IntelliSense suggestions will assist you throughout the process, helping to prevent potential mistakes and make development more efficient.
But, achieving this is only possible if you know how to implement the type annotations, which is exactly what we'll cover in this guide.
Basic Concepts and Terminologies
Let's keep it breezy! No hefty documentation here — just a quick vibe on what's what.
Screen: It's like the actor on your device's stage. You can see this component. Think MapScreen, ChatScreen – you get the drift.
Screen Stack: No, you can't see this on your device; it's like a backstage manager. It's a stack of screens – one on top of the other, like a deck of cards. Look out for names with "Stack," such as MapStack or ChatStack.
Navigator: This component encapsulates a group of screens and screen stacks.
A Screen has 3 important objects that you will work with: params, route, and navigation object
params object is used by the other two objects, i.e. the route and navigation objects. Whenever you move from one screen to the next screen, you would want to pass some data to the next screen. You can do so by using the params object.
Imagine this scenario: You've got a ChatListScreen, and when a user decides to dive into a specific chat by selecting it from the list, you want to smoothly transition to the ChatScreen. This way, you open up the chat interface for that particular conversation.
Now, here's the twist – how will your ChatScreen know about the "selected chat" it has to render? This is where the params object comes into play.
// ChatListScreen.tsx

// Pass params to ChatScreen
const params = { username: "misterCat123" }
navigation.navigate("ChatScreen", params); // send username to ChatScreen
// ChatScreen.tsx

// Pass access params in ChatScreen
export const ChatScreen: FC<TChangeLocation> = ({ route }) => {
    const { username } = route.params // Receive username in ChatScreen
    ...
    ...
}
Here, we observed that the navigation and route were employed to pass and receive the params object, respectively. But there's a crucial question – how do both of these objects know the type of params? Both of them must be aware that the params object precisely has one property named username whose type is string. All the nuances required to establish the correct types for these three objects will be explained in the upcoming example of the two-level nested navigators.
Understanding Type Annotations with two-level nested navigators
Imagine a scenario where we have two levels of navigators as shown in the image below:
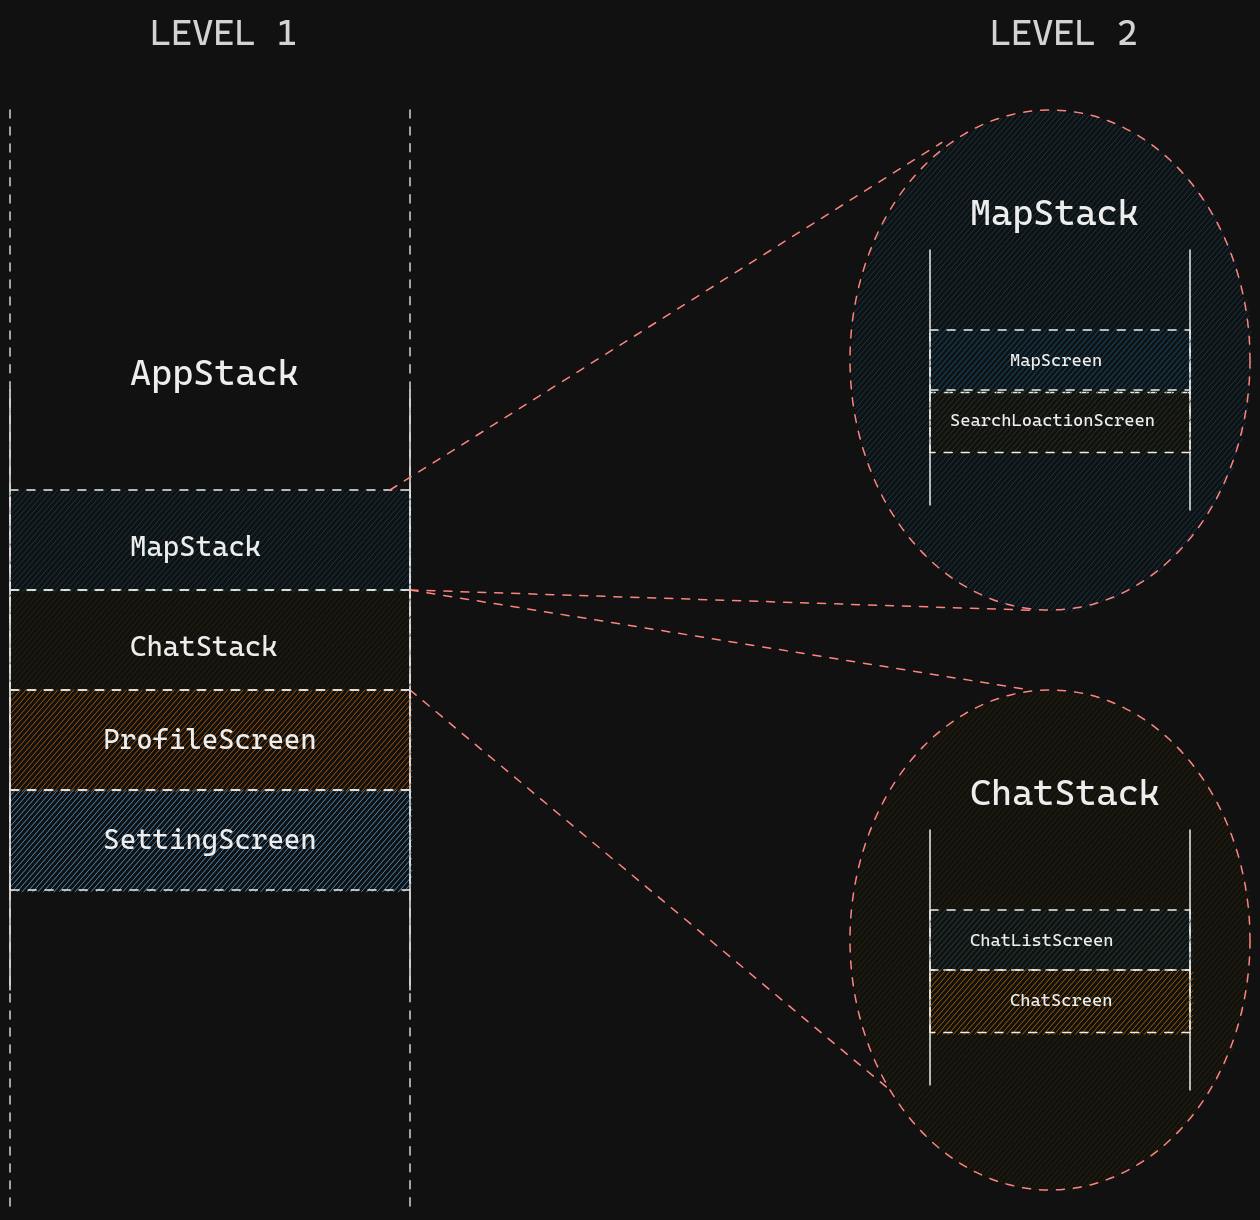
In the example illustration above:
At level 1, we have one navigator:
AppStackNavigator, encapsulating:Two Screen Stacks (
MapStackandChatStack)Two Screens (
ProfileScreenandSettingScreen)
// AppStack.tsx
import { createBottomTabNavigator } from "@react-navigation/bottom-tabs";

const Tab = createBottomTabNavigator<AppStackParamList>();

const AppStack = () => {
  return (
    <Tab.Navigator>
      {/* Define screens and screen stacks */}
      <Tab.Screen name="MapStack" component={MapStack} />
      <Tab.Screen name="ChatStack" component={ChatStack} />
      <Tab.Screen name="ProfileScreen" component={ProfileScreen} />
      <Tab.Screen name="SettingScreen" component={SettingScreen} />
    </Tab.Navigator>
  );
};
At level 2, we have two navigators:
MapStackNavigator, encapsulating two Screens (MapScreenandSearchLocationScreen).// MapStack.tsx import { createNativeStackNavigator } from "@react-navigation/native-stack"; const Stack = createNativeStackNavigator<MapStackParamList>(); const MapStack = () => { return ( <Stack.Navigator> <Stack.Screen name="MapScreen" component={MapScreen} /> <Stack.Screen name="SearchLocationScreen" component={SearchLocationScreen} /> </Stack.Navigator> ); };ChatStackNavigator, encapsulating two Screens (ChatListScreenandChatScreen).// ChatStack.tsx import { createNativeStackNavigator } from "@react-navigation/native-stack"; const Stack = createNativeStackNavigator<MapStackParamList>(); const MapStack = () => { return ( <Stack.Navigator> <Stack.Screen name="MapScreen" component={MapScreen} /> <Stack.Screen name="SearchLocationScreen" component={SearchLocationScreen} /> </Stack.Navigator> ); };
IMPORTANT:
TheAppStackNavigator operates as a Bottom tab navigator, rendering a Bottom tab to effortlessly switch between screens.On the flip side, the other two Navigators,
MapStackandChatStackfunctions as Native Navigators, constituting fundamental Screen Stacks.Grasping this distinction will prove beneficial when you later assign types to the
navigationandrouteprops for each screen.
Step 1: Assigning Types to the params Object
You may have noticed the XyzStackParamsList types in the preceding code blocks where we created the navigators.
// AppStack.tsx
const Tab = createBottomTabNavigator<AppStackParamList>();

// MapStack.tsx
const Stack = createNativeStackNavigator<MapStackParamList>();

// ChatStack.tsx
const Stack = createNativeStackNavigator<ChatStackParamList>();
In this context, the types AppStackParamList, MapStackParamList, and ChatStackParamList plays the role of providing types for the params object
Let's construct those types step by step.
For ease of understanding let's construct types from the bottom up.
So first comes level 2 navigators. We'll focus on ChatStackParamList for now. I understand that you'll handle MapStackParamList. Here's the continuation:
// types.ts

type ChatStackParamList = {
  ChatListScreen: undefined; // No data is passed to this screen
  ChatScreen: { chatId: string }; // Always includes chatId when navigating to ChatScreen
  // (See "Basic Concepts and Terminologies" for an example of how chatId is used)
};

type MapStackParamList = {
  // You get the idea. It's similar to ChatStackParamList
}
Now let's move on to defining AppStackParamsList (Level 1 navigator)
// types.ts

import { NavigatorScreenParams } from "@react-navigation/native";

type AppStackParamList = {
  MapStack: NavigatorScreenParams<MapStackParamList>; // Nest MapStackParamList
  ChatStack: NavigatorScreenParams<ChatStackParamList>; // Nest ChatStackParamList
  ProfileScreen: { name: string, username: string }; // Data passed to pre-fill ProfileScreen
  SettingScreen: undefined; // No additional data is passed here
};
Here you can observe that Screen Stacks are also assigned params types. You might wonder, "Ashu, aren't params intended for data passed between screens? Why are we passing params data to a Screen Stack?" Well, it's straightforward. Screen Stacks consist of screens, and you might want to pass data to those individual screens within the Screen Stack.
In this context, we utilize the generic type NavigatorScreenParams to accurately define the expected params for each screen within the Stack. This ensures that when navigating to a specific screen within the Stack, the provided data aligns with the expected types.
In
NavigatorScreenParams, the term "NavigatorScreen" can be swapped with "Screen Stack." Why the interchangeable use? Well, a Screen Stack, true to its name, houses a "Navigator", and within its confines, it showcases one of the many "Screens" it encapsulates. Clear as day, right?
Step 2: Assigning Types to the navigation and params Objects
The navigation and params are called Screen props. Let's focus on screens and define their prop types. Here we are excluding Screen Stacks as they don't have Screen props (Only Screens can have Screen props).
These Screen props need to know the type of params object. Why? Because the navigation object is responsible for sending params to other screens. Whereas, a route object helps a Screen receive a params object from the Screen. Thus, both Screen props need to know the shape of the params object. Therefore, you will see that we will be using those ParamsLists that we constructed before. I hope you understood why it was important to construct the ParamsLists first
For ease of understanding, let's build these prop types from the top down, starting with the screen components of the level 1 navigator. For illustration, we'll begin with ProfileScreen.
// ProfileScreen.tsx

export const ProfileScreen: FC<ProfileScreenProps> = ({ route, navigation }) => {
    const { name, username } = route.params // Receive ScreenProps
    ...
    ...
    return (
        <Button
            title="Settings"
            onClick={() => navigation.navigate("SettingScreen")}
        />
    )
}

// types.ts
import { BottomTabScreenProps } from "@react-navigation/bottom-tabs";

export type ProfileScreenProps = BottomTabScreenProps<
    AppStackParamList,
    "ProfileScreen"
>;
IMPORTANT
We use theBottomTabScreenPropsgeneric type here becauseProfileScreenis a screen in the Bottom Tabs navigator (AppStackuses the Bottom Tabs Navigator. AndProfileScreenbelong toAppStack).In this context, passing
AppStackParamListensures thatProfileScreenknows about the shapes of theparamsobject of all other screens, regardless of their nested stack. But how doesProfileScreendiscerns theparamstype of screens within the nested stacks? It's becauseAppStackParamListcontains the Params List of the nested Screen Stacks.
Since ProfileScreen belongs to Level 1 Navigator, and constructing its Screen prop types was quite simple.
Let's do the same for Level 2 Navigators. Here things might seem a little complex but I will try my best to explain each line. Here we focus on constructing ChatScreen's Screen props, leaving MapScreen's Screen props to your understanding.
// ChatScreen.tsx

export const ChatScreen: FC<ChatScreenProps> = ({ route, navigation }) => {
    const { chatId } = route.params // Receive username in ChatScreen
    ...
    ...
    return (
        <Button
            title="All Chats"
            onClick={() => navigation.navigate("ChatListScreen")}
        />
    )
}

// types.ts
import { CompositeScreenProps } from "@react-navigation/native";
import { NativeStackScreenProps } from "@react-navigation/native-stack";
import { BottomTabScreenProps } from "@react-navigation/bottom-tabs";

export type ChatScreenProps = CompositeScreenProps<
    NativeStackScreenProps<ChatStackParamList, "ChatScreen">,
    BottomTabScreenProps<AppStackParamList>
>;
IMPORTANT
Here when we are using
CompositeScreenPropsgeneric which accepts two ScreenProps generics:-As for the first ScreenProps generic, we are using
NativeStackScreenPropsbecauseChatScreenbelongs toChatStack. And, theChatStackuses the Native Stack Navigator.For the second ScreenProps generic, we need to pass the ScreenProps of the parent Navigator, i.e. the
AppStack. SinceAppStackuses the Bottom Tab Navigator, we passed BottomTabScreenProps in the second ScreenProps generic.
You might wonder, this kind of looks complex, doesn't it? Types for
ProfileScreenPropswere so simple. Why do nested stack Screen Props likeChatScreenPropshave to be typed in such a way? Well, it's becauseAppStackParamsListwas sufficient forProfileScreenPropsto makeProfileScreen's Screen Props aware of theparamstype of the other screens (as explained before).
However,NativeStackScreenProps<ChatStackParamList, "ChatScreen">doesn't automatically know about the params type of screens belonging to its parent Screen Stack (theAppStack). That's where we useCompositeScreenPropsalong withAppStackParamsListto combine and propagate the necessary information toChatScreenProps.
Exercise for you
Understanding Type Annotations with three-level nested navigators
Great! Now that you've grasped the fundamentals of annotating types in React Navigation for React Native Apps, it's time to level up. Brace yourself for a more advanced challenge—understanding how to annotate types for three-level nested navigators! 😎
In this segment, I'll furnish you with an illustration and the associated navigation type annotations without delving into the intricacies. It's up to you to comprehend the code I've crafted by referencing all the fundamentals.
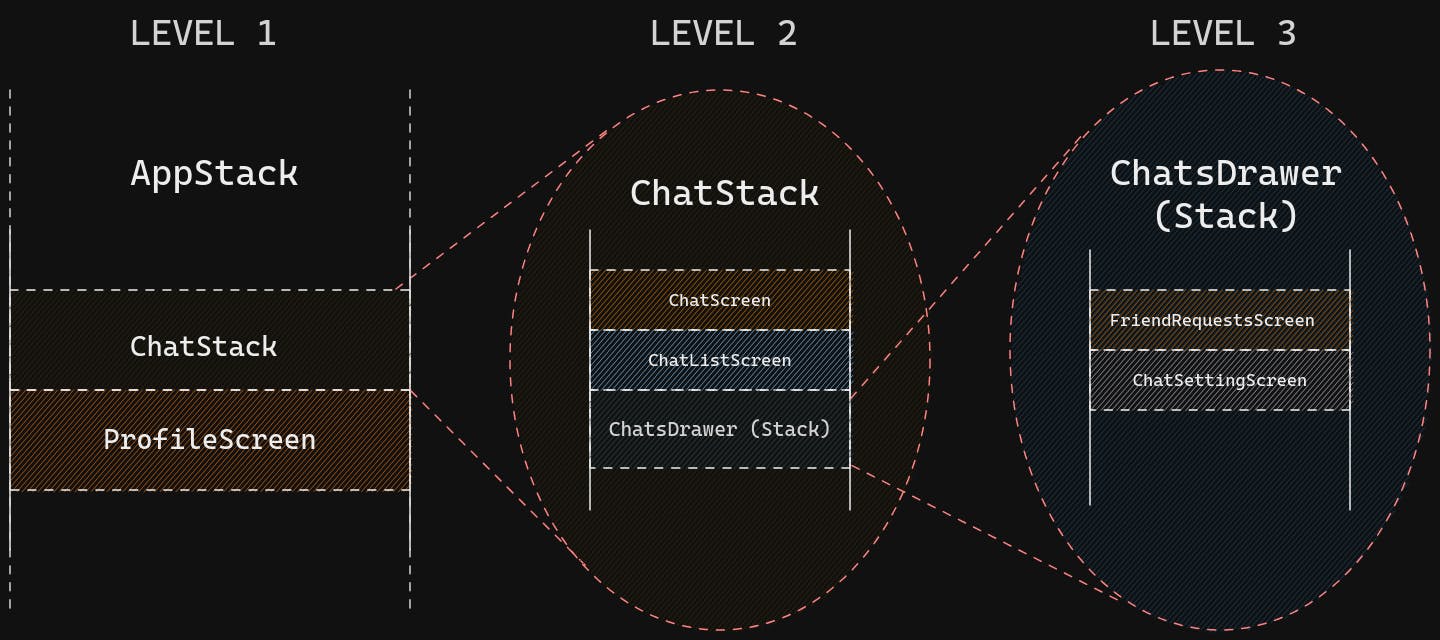
In this scenario, there are three levels of nested navigators, each containing its own set of Screen Stacks and Screens:
AppStack: This top-level navigator includes one Screen Stack (
ChatStack) and one Screen (ProfileScreen).ChatStack: The second-level navigator consists of one Screen Stack (
ChatsDrawer) and two Screens (ChatScreenandChatListScreen).ChatsDrawer: At the third level, we have ChatsDrawer, which encompasses two Screens (
FriendRequestsScreenandChatSettingScreen).
To establish a clear navigation structure, we'll construct all the necessary navigation types. As you might have guessed, we'll follow the two-step process we learned in the two-level navigator example.
First, we'll prepare the ParamsList types, working our way from the bottom up.
Then, in the second step, we'll define the Screen Prop types, proceeding from the top down.
Step 1: Preparing ParamsList Types
// types.ts
import { NavigatorScreenParams } from "@react-navigation/native";

// Constucting types bottom up

// Level 3
type ChatDrawerParamList = {
    FriendRequestsScreen: undefined;
    ChatSettingScreen: undefined;
}

// Level 2
type ChatStackParamList = {
    ChatScreen: { chatId: string };
    ChatListScreen: undefined;
    ChatsDrawer: NavigatorScreenParams<ChatDrawerParamList>;
}

// Level 1
type AppStackParamList = {
    ChatStack: NavigatorScreenParams<ChatStackParamList>;
    ProfileScreen: { name: string, username: string };
}
Step 2: Preparing types for Screen Props
// types.ts
import { CompositeScreenProps } from "@react-navigation/native";
import { BottomTabScreenProps } from "@react-navigation/bottom-tabs";
import { NativeStackScreenProps } from "@react-navigation/native-stack";
import { DrawerScreenProps } from "@react-navigation/drawer";

// Constructing Screen Prop types **for Screens** in top-down manner

// Level 1
type ProfileScreenProps = BottomTabScreenProps<AppStackParamList, "ProfileScreen">;

// Level 2
type ChatScreenProps = CompositeScreenProps<
    NativeStackScreenProps<ChatStackParamList, "ChatScreen">, // Level 2 Navigator
    BottomTabScreenProps<AppStackParamList> // Level 1 parent Navigator
>;
type ChatListScreenProps = CompositeScreenProps<
    NativeStackScreenProps<ChatStackParamList, "ChatListScreen">,
    BottomTabScreenProps<AppStackParamList>
>;

// Level 3
type FriendRequestsScreenProps = CompositeScreenProps<
    DrawerScreenProps<ChatDrawerParamList, "FriendRequestsScreen">, // Level 3 Navigator
    CompositeScreenProps<
           NativeStackScreenProps<ChatStackParamList>, // Level 2 parent Navigator
        BottomTabScreenProps<AppStackParamList> // Level 1 parent's parent Navigator
    >
>;

type ChatSettingScreenProps = CompositeScreenProps<
    DrawerScreenProps<ChatDrawerParamList, "ChatSettingScreen">,
    CompositeScreenProps<
           NativeStackScreenProps<ChatStackParamList>,
        BottomTabScreenProps<AppStackParamList>
    >
>;
You might have observed that Level 2 and Level 3 have ScreenProps type which could be simplified by using custom generic types. This eliminates redundancy. Check out this link to learn more.
I would suggest to explore how to use hooks like useNavigation and useRoute. You can annotation types to these hooks too.
That's it! I hope this guide has provided you with a clear understanding of how to annotate types in React Navigation for React Native Apps. Navigating through nested stacks might seem intricate at first, but with the right type annotations, you can streamline the development process and make your code more robust.
In conclusion, don't hesitate to experiment with different navigation structures, and always refer to the official React Navigation documentation for any updates or additional features. Check out this link to explore more about annotating types.
Remember, the best way to solidify your understanding is by applying these concepts in your projects. Happy coding!